The Ultimate Guide to DIY Wall Panel
DIY wall panel may be the ideal option for adding style to your home renovation. Whether you want to add warmth to a room, introduce a specific stylistic element, or simply for simple decoration, wall panels can serve a great purpose. In this ultimate guide, I’ll share some key steps and tips to help you complete your wall paneling DIY project with ease. From choosing the right materials to installation tips, let’s discover how to give your walls a new look.
Related Articles
How to DIY Shaker Wall Panels?
How to Panel a Wall: DIY Wall Panels in 7 Simple Steps
12 Things to Consider When Installing Wall Panel
I. Installation steps
– Preparation tools
– Tape measure
– Pencil
– Paper
– Masking tape
– Laser level
– Ladder
– Wood molding strips
– Nail gun armor
– Miter saw/Fine saw/Fine saw miter box
– Sandpaper (approximately 120 grit)
– Caulk
– Caulking gun
Step 1: Planning
This is the most important part of the project and also the most time consuming. Preparing such detailed plans and drawings may seem like a hassle, but once you perfect your plan, you can’t go wrong again! It also saves a lot of time in the long run!
1. Start by measuring your room
You want to measure every length, opening, bump, and depression. Also note any fixtures and fittings that cannot or should not be moved, such as sockets, light fixtures or built-in furniture.
2. Draw a floor plan of your room
You don’t need any fancy software to do this, just measurements, a ruler, pen and paper will do. Once you have the drawings, you can start planning!
3. Design your paneling options
Get yourself some sketching paper, any tissue paper you can see will suffice, even baking paper! And place it on your painting.
4. Now it’s time to start sketching
Right now, understanding what’s realistic and what your options are is more important than having a great drawing. As you can see, I also moved the furniture in the picture to line up with the paneling.
5. Look at your room
Are all walls the same size? Do you have any specific features to consider? Have you thought about how your paneling will look?
Start by drawing lines representing the width of each panel. Basically, you divide the wall into sections. Literally just trace lines along the walls of the room and try to find a pattern that works for you.
Here are some tips for making this pattern work:
– Can you find a common width? How wide is the door? How wide is the smallest wall – could this be the size of the panels?
– Adjust the width of the panel.
– Adjust the width of the space between panels.
– The sections don’t have to be the same size, you can use two or even three different panel widths. We recommend using no more than two or three different sizes to maintain a coordinated feel.
– Do you have any art that you would like to hang in the paneled section? Make sure the portion is big enough!
Try as many options as possible, and even if you think you’ve found the perfect solution, try to find more. You’ll be surprised how many options there are! Sometimes, the people you work hard for are the best!
*NOTE
Our drawings are more precise than necessary to show you the steps. I’m sure no one will be able to understand my doodles!
6. Start preparing detailed floor plans
When you’ve decided on a design that’s right for you, it’s time to get specific. Draw the design in detail and to scale of the room drawing. Once you’ve drawn all your panels, it’s time to start thinking in three dimensions.
7. Draw an elevation of your room
Don’t worry, it sounds more complicated than it is! Imagine you are folding the walls of a room. All you have to do is project the room’s edges upwards since you already know the floor layout. Remember to label the positions of windows and doors!
8. Draw the paneling
Now that you have your floor plan ready and your elevation drawn, it’s time to add the paneling. You’ve already drawn the lines of the paneling on the floor plan, so just project the paneling onto the elevation, the same as you did for the walls.
Now you can really start to get an idea of how the paneling will look in your room, and you can start thinking about how to further divide the paneling.
Do you want wainscot railing or picture railing? How tall are your panels? Are there any gaps between the baseboards and are there panels on the doors and windows? Most importantly – how does it look? Do you like the plan so far? Do the panel sizes look proportional? Will any adjustments make it look better? Don’t forget to consider the width of the wood moldings, too!
Make sure you are very happy with the design before moving on to the next step. Remember, it’s easier and faster to work out the placement of the panels on paper!
Here are some tips for making this pattern work:
– Don’t forget to consider the location of outlets and switches! You don’t want to end up with an outlet in the middle of the panel! Don’t assume they are at the same height!
– Consider all the walls of your room. It would feel more harmonious if the panels on opposite walls mirrored each other.
– Planning is the most important step in the entire process. Installing paneling is actually pretty easy with a little prep work.

Step 2: Preparation
1. Transfer the dimensions of the drawing to the wall
Once you’ve decided on the design of your paneling, it’s time to transfer it to the wall. Based on all the planning you did in step one, this should be fairly easy.
Use a tape measure and pencil to go around the room and make a mark at the location of each vertical line/panel. Then mark where each horizontal line/panel will be. In our case, we installed a dado rail with a small panel below and a larger panel above.
2. Attach your design to the wall
Your wall should now be filled with small dots representing where you will install the panels. To make life as easy as possible, we used a new laser level to project the lines onto the wall.
Once our lines were projected onto the wall, we just used a lot of masking tape to move around the room and mark the placement of the panels.
It’s so fast and saves a lot of trouble with a level! Best of all, you can project a line around the room (horizontally and vertically), which means it’s best to have panels on opposite walls perfectly aligned with each other.
When it comes to actually installing the paneling, the job will be easier if you don’t have to install it directly over the masking tape, so it’s important to decide whether to tape inside or outside the measured line. This will allow you to install the paneling next to the masking tape.
If you’re installing paneling in a large room, we fully recommend using a laser level, but a regular level will work just as well.
Step 3: Installation
As weird as it sounds, installing the paneling was the easiest part of the project!
Cut the wood to appropriate size. Please check your measurements carefully (more than once!) before cutting.
You can cut the panels by hand using a fine saw and a miter box, it may seem like a scary tool but honestly I can’t believe we’ve ever done any DIY without it and it’s so easy for us One of the most commonly used tools! Ours is the entry-level version, and the price is really not expensive.
Quickly sand the rough edges with sandpaper (approximately 120 grit). The cleaner the cuts and edges, the easier it will be to secure the wood to the wall and achieve a professional finish.
If you must join any length of paneling, don’t just push the ends together. Cut at a 45° angle so they snap together. This way, the connection will not be visible when you draw it.
Tips
We recommend purchasing your paneling at a lumber merchant rather than a DIY store. We find that the quality is better, but more importantly, the wood tends to be straighter, which makes installing them very, very easy!
Put up the paneling!
This is the step you’ve been waiting for.
We used nailless nails to secure the paneled walls along the stairs, but there was so much paneling to secure that I wouldn’t recommend this for a larger project.
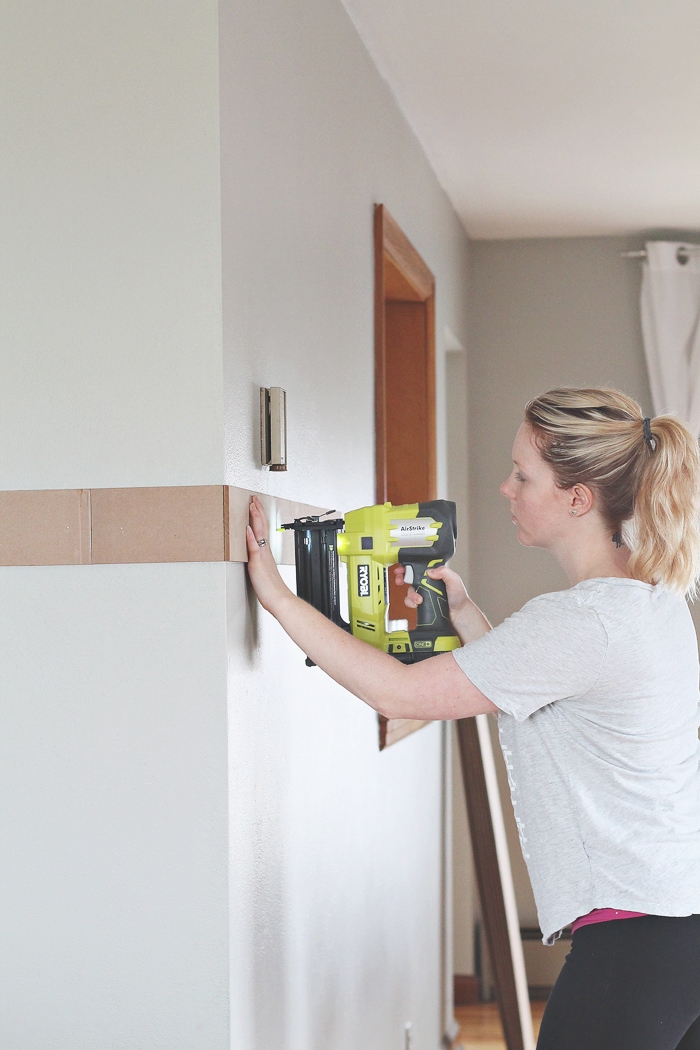
This time we used a staple gun to secure the panels. Nail guns are very expensive, and although we love ours, we don’t recommend buying one just for one project. Luckily, you can easily rent a nail gun if you don’t want to spend the money to buy one yourself.
Attaching the paneling to the wall is the easiest and fastest part of the project. Secure the panel in place, depending on how you plan it on the inside or outside of the edge of the masking tape, and nail it to the wall.
If you are installing wainscot rails, we recommend starting with it. This will be your main horizontal line and you can use it as a guide to make sure all the other panels you nail are parallel to it.
Because you’re attaching the paneling pattern to the wall with masking tape, you don’t need to take any measurements or even check that it’s level, like you did in the previous step!
Ideally, you will have someone to help you with this step, as it will be much easier if you have someone to hold the panel while you nail it to the wall. Remember, consider the location of any cables or pipes before you start nailing into the wall!
Once all the panels are installed, remove the masking tape and you’re done!
Step 4: Complete
This step is a little time consuming, but crucial to getting flawless and professional results. You must caulk each edge and join.
Caulk is your friend!
It hides any imperfections, it connects the panels to the wall and makes everything look neat and clean!
Squeeze a thin strip of caulk into the opening while holding your caulk gun at an angle to the edge. Next, smooth the caulk by dipping your finger into water and pressing it into the edges.
When the caulk dries, you can sand it down, but that’s a pain. It’s also much quicker to take the time to fill the caulk while it’s still wet.
All that’s left to do is step back and admire your new paneling!
Before beginning to paint the space, we advise giving the caulk at least 24 hours to dry.
Planning and installing paneling may seem complicated, but in reality, it’s not complicated or difficult at all. It actually only takes 4 steps and most of the prep can be done from the comfort of your couch! Take your time and make sure to plan and record everything as precisely as possible.

II. Tips on how to plan and install paneling
1. What should be done?
– If you must join two pieces of wood to make a longer panel, cut the ends at an angle to join them. This is a more secure connection and the connection will be less obvious.
– Calculate the required number of panels correctly and multiple times.
– Cut a template piece for yourself so you may use it to measure all the other pieces you cut when making numerous pieces of the same size. Making sure all the pieces are exactly the same size will make installing the paneling much easier!
– Use nails and a miter saw. If you are only paneling on a small area then a fine saw, miter box and some glue will do, but if you are paneling on a larger area or your walls are not 100% straight I would not recommend it.
– Use a laser level. Of course, it’s possible to use a normal level, but it might drive you crazy and the project will take a lot longer to complete.
2. Don’t forget to do things!
– Don’t forget to consider the location of outlets and switches!
– Remember to find the locations of pipes and cables. Even though we were very careful, we nailed the cable! Needless to say, this was not our best DIY moment. If you’re not even sure where the cables are, use glue.
– Caulk makes paneling perfect! Don’t skip this step! Wet your fingers when applying caulk. It will make smoothing much easier and cleaner.
– Don’t neglect your furniture and art. When planning the layout of your paneling, think about where you will place your furniture and where you want your art to be displayed.
III. How to deal with uneven walls?
While there are things you can do to repair uneven walls, such as replastering, the cost of doing so can quickly add up. Wall panels, on the other hand, can effectively hide any uneven or unattractive surfaces, and for much less money.
1. Preparation
You don’t have to be a do-it-yourself expert to know the importance of preparation. Be sure to have all the tools and materials you need ahead of time.
So, what do you need? We recommend using a level, saw, nail gun, hammer, tape measure, nails, paneling adhesive, panel trim, and a stud finder. Also, make sure your panels are ready!
2. Find the studs
When the wall is uneven, it’s important to find the studs before proceeding. Once you find the studs, you can secure the wall panel to them and make sure the installation is locked and secure.
This is why you need a stud finder! Use this to help you find the studs, then mark them on the wall so you know where they are when it’s time to hang your new paneling.
3. Take accurate measurements
Now that you’ve found and marked the studs, it’s time to move on to the next step: measuring the wall. Be sure to measure the height and length of the wall accurately. Also consider any uneven portions of the wall. Once you’ve taken your measurements, determine how many panels you’ll need to cover the entire surface. Keep in mind the width of the panel.
4. Apply adhesive and stick
Once you’ve taken your measurements into account and have your panels ready, you’re ready to move on. Apply adhesive in a thin layer to the back of each panel. Apply evenly, paying attention to any uneven parts of the wall.
After applying adhesive to the back of the panels, start attaching them to the wall. Start at the top and work your way down. Use a nail gun or a hammer and nails to secure each panel to the studs you found earlier. You want the installation to be secure, but not to fasten the paneling to the wall too tightly or you may cause the paneling to crack.
5. Trim, sand and paint
Once the panels are mounted on the wall, it’s time to put the finishing touches on them. We recommend adding embellishments. Trim helps conceal visible gaps between walls and panels.
After adding the trim, continue sanding the paneling. This will smooth out any bumps or rough edges and prime the panel for the next and final step of painting.

IV. FAQs
Here are a few group questions we get asked time and time again.
1. Is the paneling easy to install?
Yes! Planning the layout of the paneling takes time, but installing it is easy and fairly quick, especially if you use a nail gun to install it. Even a DIY newbie can do it easily. If you live in an old house, chances are things won’t go well. This can make it more difficult to install the paneling as it will look odd even though it is perfectly level and straight.
2. How to fix wood paneling to the wall?
For this type of paneling, you can use a nail gun or strong adhesive to secure the paneling to the wall. We recommend using a nail gun as it makes installing the paneling faster and easier, especially if your walls are uneven. These are the nails we used to secure the paneling. We love it and highly recommend it.
Strong adhesive works well, but it takes longer to install the room’s paneling because you have to wait for the adhesive to dry. The best paneling adhesive is the one we use to attach picture rails and paneling in areas where nails can’t be driven.
3. Can screws be used for paneling?
We recommend using glue or a nail gun to secure the paneling. The head of the screw is quite large, making it difficult to countersink. You’ll end up with a pretty big hole to fill, which is also harder to hide,
4. How much does the wall panel cost?
The more panels used, the more expensive the project will be. The cost, especially if you stick the panels all the way to the wall, can quickly add up.
5. How to deal with the edges and corners of wall panels?
Corners and edges are often the most challenging parts. Be sure to use the proper tools and techniques to ensure a smooth, clean connection and installation of the wall panels in these areas.
6. Where can I find more DIY wall paneling inspiration and guidance?
Online resources, renovation magazines, DIY community forums, and video tutorials are all great places to find DIY inspiration and guidance. You can also consider asking professionals for advice or looking for local DIY workshops.
V. Conclusion
Decorative wall panels are a simple way to change the mood of your interior, and completing the project with DIY can add a sense of belonging to your home. Whether you are a beginner or an experienced DIY enthusiast, I hope this guide will provide you with inspiration and guidance. Remember, patience and carefulness are the keys to success, but also don’t forget to enjoy the entire creative process. Finished with care, making your home more comfortable, unique and personal. I wish you happy DIY and successful wall panel decoration! If you have any questions about installation, please feel free to contact us!
Quick Quotation


